How to add Texture to Wall
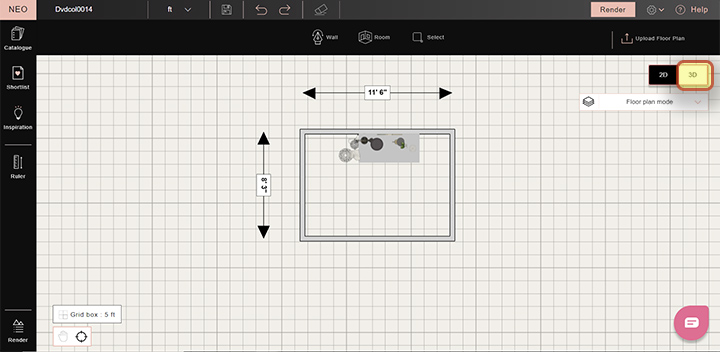
2. Use the ‘Wall’ tool or ‘Room’
tool to draw walls on the canvas.
Note: The nib-shaped Wall tool on the top row of the page helps you draw walls (as circled below).
Room tool helps you draw square or rectangular walls on a floor plan.
To know more about how to draw walls CLICK HERE


Note: The nib-shaped Wall tool on the top row of the page helps you draw walls (as circled below).
Room tool helps you draw square or rectangular walls on a floor plan.
To know more about how to draw walls CLICK HERE
3. To add wall textures, select 3D mode and click on ‘Textures’ on the top left
column of the page and select ‘wall papers, wall finishes, wall paints, etc’

4. Click on Wallpapers to view various textures. Click on the heart-shaped icon next to textures to shortlist them.
5. Click on ‘Shortlist’ button on the left-hand
side of the column to view your shortlisted textures.
6. Drag and drop the texture on the requisite wall.
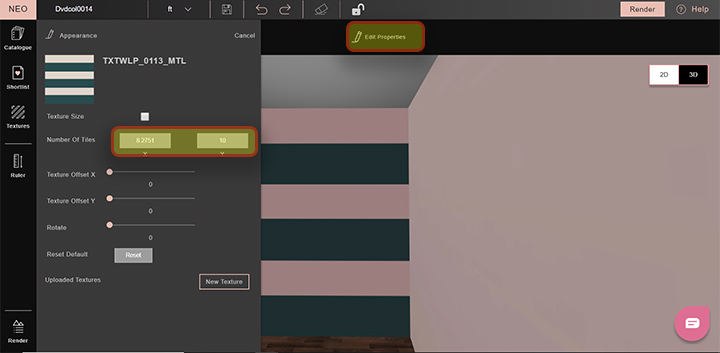
7. To edit your wall texture press shift+single left click. An Edit properties button will appear on the top.

8. Click on the Edit properties button to make changes to your texture.
9. Change the tiling frequency of your texture by changing variables on the X or the Y axis insert value box respectively.

10. To edit the texture on another wall, follow the same procedure.
11. Your final wall textures are ready with edits and will look like this:

We hope this step-by-step guide on ‘How to add wall textures' helped you understand this useful
feature in Foyr Neo. For any queries or questions feel free to contact us via accessing the HELP section within Neo to chat with us or write at connect@foyr.com