How to Draw Floor Plan from Scratch
1. To begin drawing a floor
plan, login to your Foyr Neo account on www.foyr.com
The subsequent steps
to draw a floor plan using a wall and room tool can be performed by uploading a
floor plan as well. However, to draw walls you will be required to use the Wall and room tool trace on the uploaded floor plan. CLICK HERE to know more.
2. To
draw a wall, use the ‘Wall’ tool on
the top toolbar. Click the Wall button and then click and drag from the point
where you want to begin drawing the wall.

3. You may also use the Room tool to draw square and
rectangular rooms. Click the Room button and then click and drag from the point where you want to begin drawing the room.

4. For
accuracy, you may enter exact dimensions in the text box provided at the corner
of the room drawn. For example, to create a room of 20 ft X 20 ft, simply draw a room
using the Room tool and then enter 20, 20 in the two text boxes next to the
room being drawn.
5. You
can draw walls from any point on the canvas, within rooms or any point on a
wall using the Wall tool.

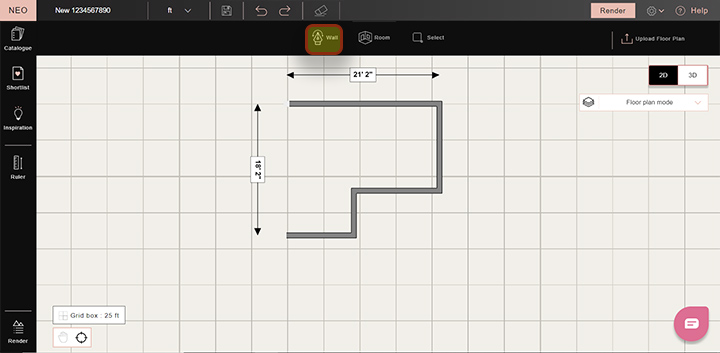
6. You can continue drawing walls as long as you’re in Wall tool mode. To help you draw seamless walls, a new wall is automatically started from the point where the last wall ends,as shown below:
To exit the continuous Wall tool mode, simply click on a blank space on the canvas, or click again on the Wall tool.
7. There
are instances where you may need to change the properties such as thickness and
appearance of a wall. Just click on the requisite wall segment and click on edit properties on the top contextual
bar to change wall dimensions and color.

8. View
the floor plan in 3D mode on the right side of the page.
Drawing a floor plan has many features that are intelligent. Here is a
list of some features that make floor plan designing easier:
Snapping: This smart feature of Foyr Neo assists in drawing the perfect floor plan. While
drawing a wall, snapping allows the user to start or end the wall exactly at
the following points
1.Edge of a wall/room
2.Corner of a wall/room
3.Orthogonal to a corner of a wall/room
4.In the same line as a wall
You can bypass this feature by holding Shift key while
drawing a wall
Merging: This tool
helps you to merge walls with other walls. Simply click and drag a wall towards
another wall and leave it close to the other wall or on it. The two walls will merge together to form a single wall.
Surface Detection: This intelligent feature helps you move around an
entire room. Just click on the surface so that the entire surface gets
highlighted. You can now move the surface or delete it in one shot.
Detach/ Attach surfaces: The merging feature (defined above) works
well with surfaces as well. This feature helps you create, merge and
disintegrate spaces according to your design to help you explore symmetry and space.
Guidelines: Guidelines are motion assisted placement and drawing
prompters that help you in maintaining the symmetry of walls introduced in the
floor plan. This is a smart feature of the software which provides assistance
in drawing and aligning walls in a floor plan.
You have now learned ‘How to
draw a floor plan using the Wall tool and Room tool from scratch’. We hope this
tutorial guide helped you understand the useful features in Foyr Neo.
This video explains how to create floor plans in Neo.
You have now learned ‘How to upload a floor plan from scratch’. We hope this tutorial guide helped you understand the useful features in Foyr Neo. For any queries or questions feel free to contact us via accessing the HELP section within Neo to chat with us or write at connect@foyr.com.